NCPP User's Guide

Version 2.3.2


Table Of Contents

  1. Overview
  2. Getting Started
    1. Acquiring
    2. Environment
    3. Command line options
  3. Probe Selection Window
    1. Selecting and Deselecting Probes
    2. Selecting data type
    3. Options
  4. Movie Control Window
    1. Moving around in Time
    2. Controlling frame updates
  5. Plot Canvas
    1. Canvas features
      1. Annotations
      2. Resizing canvas windows
      3. Zooming
      4. Menu accelerators
    2. Guide to menus
      1. File menu
        1. Data files
        2. Printing
        3. Save PNG
      2. Edit Menu
        1. Editing plot parameters
      3. View Menu
        1. ASCII cell data
        2. Probe Variables
        3. Variable Titles
        4. netCDF header
  6. Configuration File
  7. Known problems
  8. Incomplete features

Overview

ncpp is an interactive plotting tool for Unix/Linux workstations. ncpp allows the user to view histograms of PMS-1D and other size-distribution probe data stored in netCDF files that conform to the NCAR-RAF/nimbus conventions. Both Low-rate and Mixed-rate files are supported, and files where the data have been reduced below 1 sps (sample per second), e.g., files run through ncav.

A few of its features are:

ncpp was written at the Research Aviation Facility of The National Center for Atmospheric Research to view and analyze our particle probe histogram data. The NCAR-RAF/nimbus conventions were designed to store multi-rate data, i.e., variable A may be stored at 5sps and variable B at 25sps. Every effort has been made to make it "what you see is what you get" between the screen and printouts.

Note on data files:


Getting Started

Acquiring

ncpp is available at https://github.com/ncar/ncpp.

Environment

ncpp is written in C++, requiring X11/R6 and Motif 2.0 (or later), and the netCDF library 3.0 or later. Our current development platform Redhat/Fedora and MacOS.

ncpp uses, though it is not required, a shell environment variable called DATA_DIR as the default directory to locate data files.

Command Line Options

data_file, a netCDF data file that conforms to the NCAR-RAF/nimbus conventions.

Examples

Run with no command line parameters:
1024% ncpp

Load a single data file:
1025% ncpp /home/data/162rf08.cdf

Probe Selection Window

Selecting and Deselecting Probes

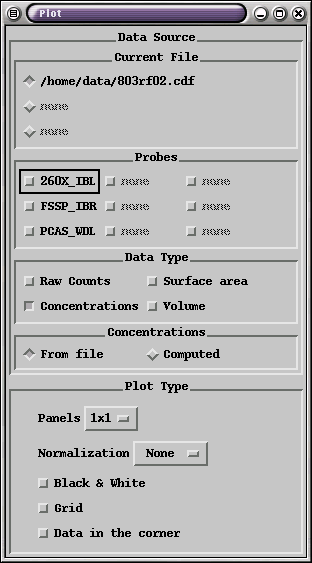
After you have selected which data file, turn on the probes you wish to view. Multiple probes may selected.

To de-select a variable, click on it again. The file, axis, location and panel must all match from when the variable was selected. This can get confusing if you are drawing data from multiple files.

Data Types

Turn on which data types you wish to view (you may select more than one). Turning off all data types will cause a core dump at this time.

Concentrations

You may choose to have ncpp read concentrations from the netCDF file (the default), or compute them on the fly. Computing is useful if you want to modify certain probe parameters (see Edit Cell Diameters).

Options

Panels
This allows you to select how many Postage stamps to display per data type.

Normalization
This allows you to select a normalization method for dividing down concentrations. Options are None, Linear, and Log.

Black & White (on/off)
Converts all color traces to black and white. Dashed lines are used to differentiate variables in black and white. This option is provided to let the user preview black-and-white print-outs.

Grid (on/off)
Turns grid on or off.

Movie Control Window

Moving around in Time

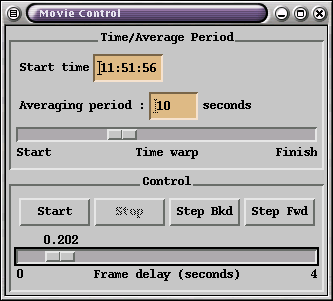
ncpp defaults to the start time of the flight, and a 10 second averaging period per frame. New start times and averaging periods may be entered at the top of the Movie Control window. There is also a slider called Time warp that let's you quickly move to a new start time.

Controlling frame updates

To start movie style updates, press the Start button. Frame update rate will depend on how fast your computer is, number of seconds in averaging period, and number of probes selected. Increase the frame delay via the Frame delay slider. When the movie is not running, Step Fwd and Step Bkd buttons are provided.

If the flight wraps around midnight, times past midnight should be greater than 24:00:00 (e.g. 1:00am start time should be entered as 25:00).


Canvas Features

Annotate
ncpp has the ability to annotate graphs. In the upper right corner of the main plot canvas there are a couple of buttons, one with the letter "A". Press the "A", and your pointer will turn into a text insertion style cursor. Move the cursor to where you would like to start the annotation, and press the left mouse button. Start typing, and finish the annotation by pressing return. Doing just about anything will clear all annotations (due to the difficulty of tracking their location as the user moves around in time, and rescales axes). They should be added as the final option before printing.

Resize
All plot canvas windows are fully resizable. Resizing the screen will have no affect on sizing or proportion of your printout, this is controlled via the Printer Setup option.

Zoom
A zoom feature exists; place the mouse in the upper left corner of what you want to zoom in on, hold the left mouse button down, and drag the box over the segment you want to see. Moving left or above the initial point will cancel the zoom when you let go. Your mileage may vary if autoscaling is turned on. There is one level of un-zoom located in the Options menu.

Menu accelerators
When looking through the various menus, one will notice CTRL sequences to the right of the menu option label. These are called menu accelerators, in ncpp they only work while the cursor is located in the plot canvas.

Guide to Menus

File Menu

The items in the File menu allow opening of data files from disk, printer setup, and printing. In the case of an operation that will overwrite an existing file, you will be prompted by an alert that allows you to abort the write if you don't want the file to be overwritten.

Open Data File.
This displays a File Selection Box to select a file to read. There is no error checking to see if the input file is valid. Invalid files tend to cause a segmentation fault. Open Data File will close out all previously-opened files.

Add Data File.
This displays a File Selection Box to select an additional file to open.

Save PostScript.
This displays a File Selection Box prompting for the name of the file where you want to write the PostScript output.

Printer Setup.
This pops up a window with options to change the 'lp' command, the size of plot to be printed, whether to print landscape or portrait, and color vs. black and white.

Print.
This opens a pipe and sends PostScript commands to lp(1).

Save PNG.
This option allows you to save the plot image as a graphics file, which can then be used in web pages, etc. You can adjust the size of the image saved by first sizing the plot canvas.

Edit Menu

XY Parameter
window allows the user to edit titles, labels, autoscaling, number of tic marks, and log vs. linear axis scales. This will convert the Y axis units from "N/cM3" to "N/cM3/um" to "N/cM3/ln(um)".

Cell Diameters.
This pops up a window for editing cell diameters, start and end bins, and other probe parameters used in computing concentrations.

View Menu

ASCII cell data.
This opens a window for viewing the cell data in ASCII format. Cell diameters are displayed, along with the values for all the data types (counts, concentrations, surface and/or volume). The save button pops up a file selection window allowing you to specify a file.

Probe Variables.
This opens a window showing all the housekeeping and derived parameters for each probe, and the averaged values for each frame.

Variable Titles.
This opens a window listing variables names and their titles. The "Category" menu may be used to reduce the list to just variables that belong in a given category. The category system is not perfect, our system allows a variable to exist in 1 category, even though some variables should belong in more than one category.

netCDF Header.
This opens a window with output from the ncdump(1) program.


Configuration File

ncpp will read a file titled .ncplotrc in your home directory, if it exists. Currently the 3 options that may be overridden are:

Colors = a list of seven colors space and/or comma seperated.
PrintCommand = new print command (eg: lp -d color -o nobanner).
PrintColor = Color (default is B&W).
LineWidth = # (default is 1).

Colors = red,blue,green,yellow,maroon,orange,
PrintCommand = lp -d color -o nobanner
PrintColor = Color
LineWidth = 2
The Unix command showrgb(1) can be used to view a list of all available color names (showrgb | more). The Colors option allows you to override the plot trace colors.

Known Problems


Incomplete Features


Author

Christopher J. Webster
National Center for Atmospheric Research
Research Aviation Facility.

email Chris Webster

Last update: Fri Nov 17 14:52:24 MST 2023