T-REX
2006 Hot-Wire Interface
NOTE: this document is evolving as
of
Contents
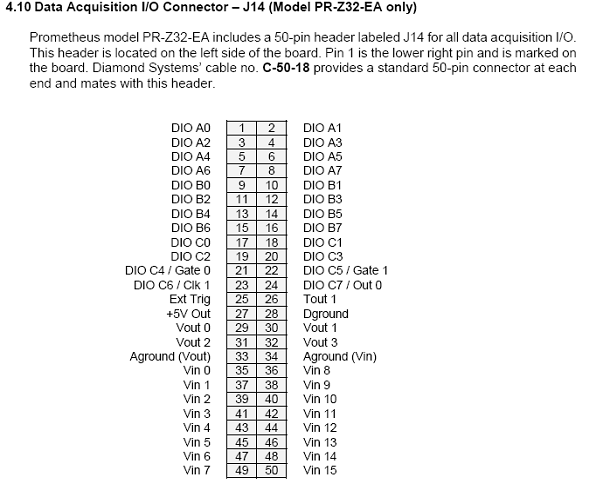
Prometheus
DAQ Connector – Motor controls and feedback assignments.
Connector Pinouts
from Prometheus Manual
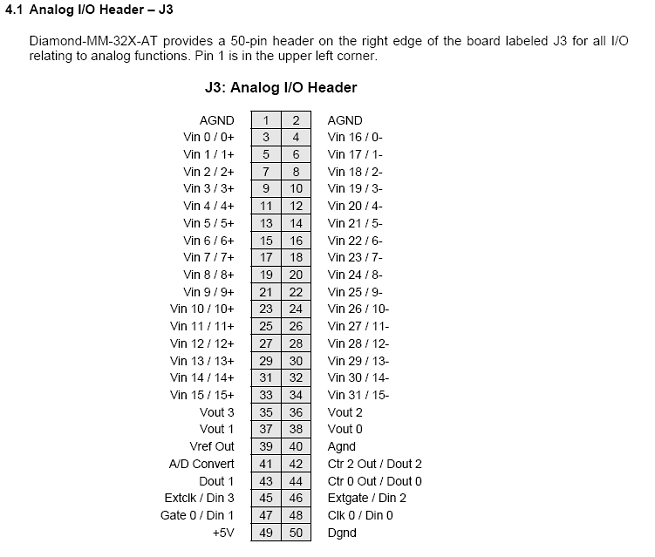
Diamond Analog Connector – Input Signal
assignments.
Connector Pinouts
from DMM-32X-AT Manual
Bulgin Pin Assignments: Not
Yet Finalized
File Reference:
Word Doc: /net/isff/projects/TREX/doc/TREX_HotWire_Interface.doc
Web Doc: /net/www/docs/rtf/projects/trex/isff/HotWireInterface.htm
Description: This document outlines the interface and wiring used for the Hot-Wire to Prometheus data system for TREX. The interface board fits a standard NDAQ footprint of ~3.5x6” to fit on the existing bulkhead panels. Because only 1 board is needed it will be built as a prototype PCB and coated ‘by hand.’ Components used for the interface are referenced at the end of this document.
Power Connections: +12VDC Power for the interface panel is provided via connector J1 from the PC104 stack power supply.
Ground Planes / Bonding: There are two isolated ground planes on the interface panel: one for power/digital ground and the other for analog ground. These planes are not bonded to each other or to earth via the mounting hole pads. Bulgin connectors have pin-8 and pin-2 (shield) directly connected to the dig/pwr. ground plane.
Prometheus DAQ Connector – Motor controls and feedback assignments.
The Prometheus 50-pin connector J14 is attached to J2 on the interface panel. The following table summarizes the signal and pin assignments for this connector.
Note:
PortA=Input, PortB=Output, PortC=Input
|
|
Dir. (+5)
Control |
Motor +12
Control |
Photo-1 Bulgin –
Pin 1 Stepping
Clock |
Photo-2 Bulgin – Pin 2 Left Limit |
Photo-3 Bulgin – Pin 6 Right Limit |
Photo-4 Bulgin – Pin 7 Right Limit |
Photo
Interrupter +5 Vcc |
|
Motor - 1 |
B6 – 15 |
B7 – 16 |
C4 – 21 |
C6 – 23 |
C0 – 17 |
C2 - 19 |
B4 - 13 |
|
Motor - 2 |
B2 – 11 |
B3 – 12 |
A4 – 5 |
A6 – 7 |
A0 – 1 |
A2 – 3 |
Ditto |
|
Motor - 3 |
B0 – 9 |
B1 – 10 |
A3 – 4 |
A1 – 2 |
A7 – 8 |
A5 - 6 |
Ditto |
Connector Pinouts from Prometheus
Manual
Diamond Analog Connector – Input Signal assignments.
The Diamond MM-32X-AT 50-pin connector J3 is attached to J3
on the interface panel. Inputs are
routed as differentially with the option of jumpering the ‘shield’ pin to the
analog ground plane if needed. The
following table summarizes the recommended signal and pin assignments for this
connector. These can be obviously
changed by plugging in the BNC cable connectors elsewhere!
|
|
U-Component Signal -
+/- pins |
V-Component |
W-Component |
|
Motor - 1 |
VinO – 3,4 |
Vin1 – 5,6 |
Vin2 – 7,8 |
|
Motor - 2 |
Vin3 – 9,10 |
Vin4 – 11,12 |
Vin5 – 13,14 |
|
Motor - 3 |
Vin6 – 15,16 |
Vin7 – 17,18 |
Vin8 – 19,20 |
Connector Pinouts from DMM-32X-AT
Manual
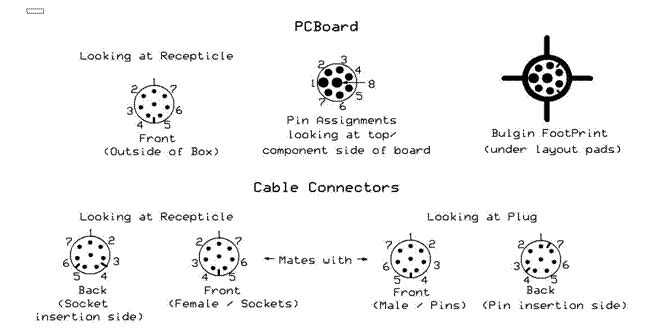
Bulgin Pin Assignments: Not Yet Finalized
|
Cable-Wire |
Bulgin Pin |
Description |
Misc |
|
A = Red |
1 |
Input: Photo Interrupter -1 |
Stepping Clock |
|
B = Bare |
2 |
Shield |
Direct connect to Ground Plane |
|
E = |
3 |
Switched +5 |
Vcc for Photo Interrupters |
|
D = |
|
Motor Gnd – Default direction |
Relay Pin-6.
+12 with Dir.Control high |
|
C = |
5 |
Motor +12VDC – Default direction |
Relay Pin-3.
Gnd with Dir.Control high |
|
F = |
6 |
Input: Photo Interrupter -2 |
Left Limit Position |
|
G = |
7 |
Input: Photo Interrupter -3 |
Right Limit Position |
|
H = Black |
8 |
Ground |
Direct connect to Dig.Ground Plane |
DC Motor w/Encoder: One motor is used for each of the 3 hot-wire arrays, rotating the probes horizontally.
Excel Spreadsheet to
calculate pulse rates and angular resolution:
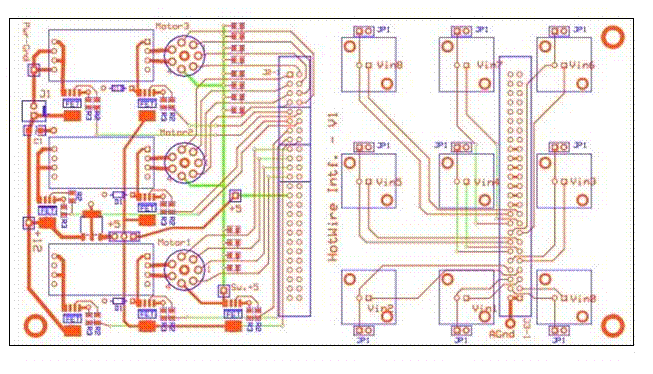
The layout was done without a schematic….due to simplicity ahem...
When using the FETs, a pullup resistor is used to enable the output. The data system must turn off the FET by pulling the lines low, floating lines will be pulled high.
MosFET IPS521: There are 3 uses of these FETs on the board. First is turning on +12 power for the DC motor, Second is turning on +5 to toggle the direction of the relay for reversing the motor. This is overkill because only 40mA is needed however, we have many of these parts on hand and they work well from logic levels. Third is to turn on the +5 Vcc supply to the PhotoInterrupters all at once.
PhotoInterrupter: There are 3 IR optical switches for each motor. Two used for the direction limits and a third for the stepping clock as the motor rotates the hotwire direction.
Reed Relay: There is one reed relay used for switching each motor direction.
Bulgin Connector: Same connector used in NDAQ.
+5V Voltage Regulator: This SOT-223, 500mA, UA78M05 optional part is suggested provide +5 in lieu of the 5-volt provided by the Prometheus I/O connector. Even though that signal is apparently tied directly to the main PC104 supply, the 7805 provides a backup capability if for some reason the current draw is more than provided via the Prometheus. Digikey p/n = 296-12290-1-ND